𝔦𝔱'𝔰-𝔞 𝔪𝔢 🌠 (![[personal profile]](https://www.dreamwidth.org/img/silk/identity/user.png) lina_trinch) wrote in
lina_trinch) wrote in ![[community profile]](https://www.dreamwidth.org/img/silk/identity/community.png) killthecake2023-09-27 03:12 pm
killthecake2023-09-27 03:12 pm
Entry tags:
[Gmail] Gradient Labels! & Other Add-Ons
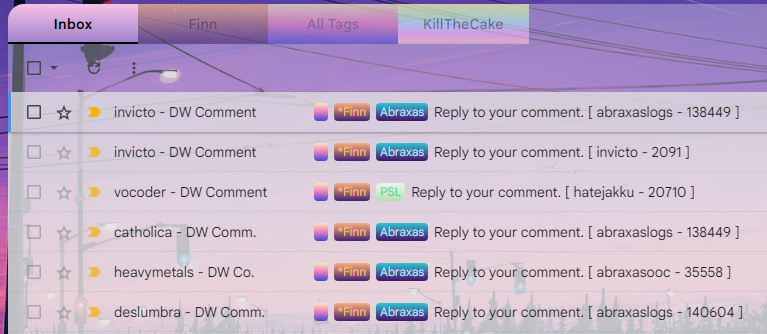
❖ There are clearly a few additions to my Gmail than the norm, and we'll go through all of that along with the meat of this post. Which are the gradients. I know you gremlins are here for the rainbows. I'm ready to provide, don't worry. ❖ Also, please note that I'm going to keep repeating "gradients" all throughout this post, but you can use this code to customize these labels however you like. Gmail doesn't have many customization options for labels, so this broadens that horizon. Get creative! ❖ This code only changes the label's background. If you want to change the text color, you have to do that manually with Gmail the old-fashioned way. ❖ There's a TL;DR at the bottom. I'm so sorry this is 75k words long. ❖ The labels appearing on the top of my email bar as tabs are courtesy of the Gmail Tabs extension for Chrome. If you use another add-on or another browser to get this same effect, this gradient code should still work. It is NOT necessary to install the extension to use these gradient labels. They work perfectly well for regular old Gmail. ❖ Yes, I need to do my tags, I know, I know, shhhhh- install stylus ❖ Okay, this extension you actually do need in order for this to work. This part is mandatory. ❖ Install the Stylus extension to your browser. [Chrome] [Firefox] [Opera] If you run into problems here, you can consult the wiki but feel free to ping me. ❖ Once installed, open the extension (on Chrome, you can click on the icon and click "Manage") and click on "Write New Style." This file is where you're going to add your codes in. ❖ At the bottom of the file, you'll see a dropdown beside a text field. In the dropdown, select "URLs starting with" and in the text field add: https://mail.google.com/. This sort of thing is usually added in automatically with the code, but since we're putting this together in parts, I thought it might be easier for you guys to do this bit manually. ❖ Make a title for your file, click save, and make sure the box labelled "Enabled" is checked. sidenote: transparency ❖ A recent-ish update on Gmail made the email transparency a lot more solid than I care for. If you feel the same way, insert this code anywhere in that Stylus file you just created. This is purely a side thing and has no bearing on the gradients. ❖ If you're using the Gmail Tabs extension for Chrome that I mentioned at the top of this post, feel free to add this tiny little style update anywhere in your file. It just makes the tabs blend in better and become a little more solid when the cursor hovers over them. the actual code ❖ Okay, we're here! This all works by what you title your label as. For example, you see my RP character's label in the example above. His label is titled *Finn so I had to add that exact wording to the code below. Where it says LABEL, just replace that with the title of the label you want to customize. ❖ Every time you want to customize another label, just copy the above and add another block in your file with the new label. ❖ The colors in the code above are just red and blue. If you're looking for some gradient ideas, might I recommend Coolors, UIGradients or Web Gradients. ❖ That "0deg" part means the degrees that the gradient moves, in this case that's up and down with the first color being at the bottom. If you want them going across, change it to "90deg". Diagonally, change it to something around "220deg" or so. ❖ Also, feel free to add in as many colors into your gradient as you want. Just separate them by commas. ❖ If you want the text in your label to disappear so that you just have the colors, add this: (Your label will still be the length of your text.) ❖ You don't have to copy/paste this bit of code for every label either. You just have to copy the first line and separate it by commas. Like so: [title="LABEL"] .av, [title="LABEL"] .av { code etc... } screw all this, give me defaults ❖ All right, this is how the defaults will work. I'll throw some code below and you're going to name your labels based on what gradients you want. They're all going to be single character symbols. If you like these gradients but not the label titles, then you'll have to change the symbols to match your label's text. All of the text in these labels will be transparent. If you don't want that, just remove the line with the symbol in the very first code block. Be careful with those commas. Okay, ready? Here we go. ! @ # $ % ^ & * ? ~ wrap up ❖ TL;DR: Scroll up to the section about installing Stylus and follow the directions about making your new file that'll work with Gmail. Once you're done there, scroll up to the above section and install the defaults. Change the symbols (!, $, etc) in the code to whatever your label title is according to the gradient you want. Bam. Done. ❖ If you want a gradient on your in-built Inbox label, the label is literally just called Inbox. ❖ If you have any problems at all with the Stylus extension, the code, the colors, whatever, just let me know. I absolutely feel like I've missed things, so please reach out if you have any problems. ❖ I take payment in the form of head pats or monetary compensation. Thank you. ♥ Have fun and enjoy. |
no subject
Here's my code:
.bkK > .nH {
background: rgba(255, 255, 255, 0.3) !important;
}
.zt,
.zt > tbody {
background: rgba(255, 255, 255, 0.5);
}
.Di > .amH,
.Dj {
color: #fff !important;
}
.cloudHQ__label_tab {
opacity: 0.6;
}
.cloudHQ__label_tab:hover {
opacity: 0.8;
}
[title="RP/Dante"] {
background-color:red;
color: #000;
}
[title="RP/Nero"] {
background-color: blue;
color: #000;
}
[title="RP"] {
background-color: green;
color: #000;}
no subject
This code can't change the actual text of the labels, unfortunately. That has to be changed manually the way you usually customize labels directly on Gmail.